#Tomb of the Great Evil Oni (大惡鬼の墓)
Contents
3-level linear dungeon plus deepest chamber (2~4 sessions). "Tomb of Horrors" × Konsei Reiyotan. 3rd~5th dan PCs. An extreme dungeon built on the assumption of death.
- Recommended party: 4~6 PCs (3rd~5th dan). Backup characters are strongly recommended.
- Difficulty: Extreme
- Rules Covered: dungeon exploration / traps / illusions / curse accumulation / sealing vs release choices / zones where automatic lull recovery is blocked

#Warning
This scenario is an intentional killer dungeon.
- Automatic recovery during a lull is blocked. Rest does not restore Wounds; only recovery you actively produce — such as performer abilities, Pure Land Monk abilities, rituals, or special rewards — works.
- No return is possible (the entrance seals; the only exits are resolving the deepest chamber or finding a bypass escape).
- When curse accumulation reaches 9, the PC turns into an NPC (an Enmadoji servant).
- Judgment > combat. A direct confrontation almost always means defeat.
Player consent is mandatory. In the pre-briefing, tell them clearly: "This scenario is different from the others."
#Background
This is the site where Enmadoji (閻魔童子) was sealed 1000 years ago. 4 monks sealed him through the precepts of the Four Virtues (四德). Now the seal is coming undone, and the force of the curse is spilling out beyond the forest.
The PCs are dispatched by Kagura Domain to investigate the cause. When they arrive, the entrance seals and closes behind them.
#Scent (香)
#Sense of the First Scene
The mountain is old. In this forest, even a falling leaf makes no sound.
Beneath their feet lies a thousand years of dust. Each step raises a gray bloom. The powder rides their breath and leaves the taste of old incense on the tongue.
The entrance stone door holds four small shrines. The Buddha's eyes have been worn away. Above them, black mist (黑霧) leaks like thread, giving weight to the air.
What reaches the ear is the sound of nothing. No birds, no insects, and even the wind avoids this ground.
#Voices of Key NPCs
Illusion of a dying child (Altar of Benevolence):
"Mister... I'm cold. Mother isn't coming. Please... please stay beside me for just a little while."
"...Why are you looking at me like that? Am I not real?"
Stone elder (Altar of Rites):
"Pay reverence to us. We have sat here for a thousand years; a moment of courtesy is not so heavy a thing."
"You who are busy: haste is the opposite of mercy. Your generation hurries itself into ruin."
Seal guardian spirit (Act 3, faint afterimage of a monk):
"...Go back. None who came here ever returned."
"If there is Loyalty (忠) within you, guard this pillar with your own hands. If there is Hegemony (覇), then your desire will wake this darkness."
#Mood Turns
Act 1 -> Act 2: Immediately after the Four Virtues trial is passed, the altar candles all go out at once. Darkness. Only the lanterns in their hands give light. The GM should pause for a beat and say, "From now on, your lights are your lives."
Mid-Act 2: the Banquet Room: A fragrance. For the first time, a good smell instead of rot. Sake, roasted meat, lilies. Make the players say "finally"; that relaxation is the trap.
Act 3: entering the Sealing Corridor: The dust stops. The air turns cool. On the walls hang portraits of the four monks of the Four Virtues. They look at the PCs. Each time the PCs choose to strengthen the seal, the portraits smile a little more faintly.
Act 4: Enmadoji appears: No sound. Only the room's temperature rises in an instant. Sweat. The taste of iron on the tongue. The PCs' weapons grow heavy in their hands. Enmadoji does not speak; he only passes judgment.
#Music and Color
Primary colors: gray and black. The orange of lantern light is the only warm color. In Enmadoji's area, red light seeps in.
Lighting tone: gradual dimming. As each act advances, the range of usable light shrinks.
BGM image: single low percussion strikes, spaced far apart. Only in Act 4 do strings (弦) enter, and even then only one note, held long.
#Structure
[Entrance: Four Virtues Trial (Act 1)]
   ↓
[1st Floor: Labyrinth of Desire (Act 2)]
   ↓
[2nd Floor: Sealing Corridor (Act 3)]
   ↓
[3rd Floor: Deepest Chamber, Enmadoji (Act 4)]#Act 1: Four Virtues Trial (Entrance)
Structure: 4 small altars. Each altar tests one of the Four Virtues (四德).
#Benevolence (仁): Altar of Mercy
- In front of the altar is a dying child (illusion). "Please help me."
- Choice: help (spend a healing resource) / ignore (efficiency)
- Trial: choosing mercy passes. Choosing efficiency gives curse +1; the child vanishes with black laughter.
#Righteousness (義): Altar of Justice
- A locked box plus a key. Beside it is "a poor person's will": "This is temple property. Do not steal it."
- Choice: honesty (return the key) / greed (open the box and gain 30 gold)
- Trial: honesty passes. Choosing greed gives curse +2; the gold is real (temptation).
#Rites (禮): Altar of Courtesy
- A seated stone elder. Its mouth moves: "Pay reverence to us."
- Choice: show courtesy (spend time) / ignore (attempt to pass immediately)
- Trial: courtesy passes. Ignoring gives curse +1 and the anger of the illusion.
#Wisdom (智): Altar of Wisdom
- Three doors. Each has a riddle above it.
- Choice: choose the correct door by wisdom (2d10+Wisdom+Stratagem >= 15).
- On failure, curse +2 and pass through a trapped door.
Pass condition: pass at least 3 of the 4 trials + curse 3 or less.
- Passing all trials: the 1st-floor entrance opens + bonus (remove curse -1).
- 3 passed: the entrance opens (no bonus).
- 2 or fewer passed: the entrance opens, but add curse +2.
#Act 2: Labyrinth of Desire (1st Floor)
Structure: maze form. 10 zones. Traps and illusions.
#Major Traps (Examples)
Room of Doubles: Mirrors create doubles of the PCs and make them attack. Each double has the same stats as its PC. When a double is defeated, that PC takes Wounds -1 (reflection). Trap disable: break the mirrors (Physique check +3).
Banquet Room: A rich table and illusionary beauties. "Please rest here." Eating the food gives curse +3 and attribute -1 (1 session). Perception >= 15 sees through the illusion.
Contract Room: A black oath document. "Sign, and one wish will be granted; in exchange, promise part of your soul." Signing grants an immediate bonus (attribute +2, 1 session) but curse +5. Refusing lets the PCs pass.
Trap Chain: pressure plate -> spike pit -> poison gas. Consecutive Disable / Perception checks. Accumulated failures cost Wounds.
#Illusion Yoma
- Illusion Warrior (Elite illusion, Wounds 3, Defense 13): vanishes when an attack succeeds. Instead, the PC feels as though they lost as much strength as they swung with.
- Illusion Yoko (Minion illusion): conversational temptation -> curse +1 each time.
- Illusion Enku (mimics a PC ally): the core trap. It calls, "Help me." If attacked, the illusion of the real ally vanishes -> guilt.
#Resource Management
- Sanctuary 1: center of the 1st floor. Protected by remnants of a Barrier. A lull is possible (Wounds do not recover. Only Energy resets).
- Curse accumulation: each trap / illusion contact gives +1~+3. At 9, the PC becomes a servant.
#Act 3: Sealing Corridor (2nd Floor)
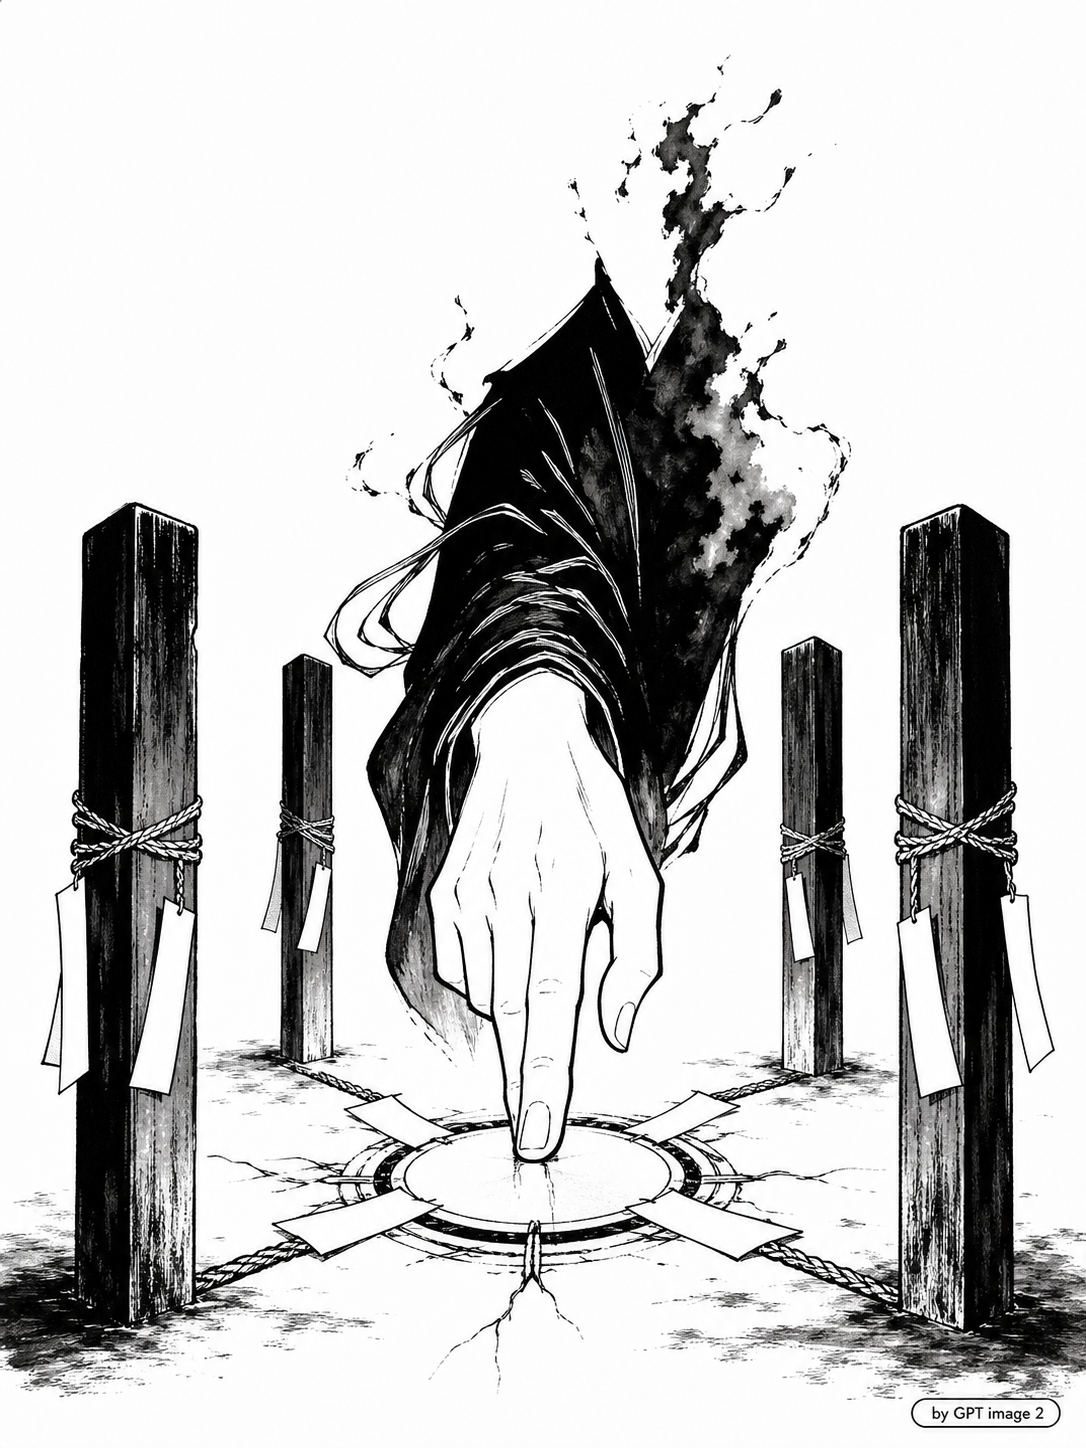
Structure: a long corridor. 4 sealing pillars.
#4 Sealing Pillars
Each pillar corresponds to one of the Four Virtues. The more pillars remain intact, the weaker Enmadoji becomes.
Choice branch:
- Seal-strengthening route: feed energy into each pillar (Sorcery / Exorcism check >= 15). Success restores the pillar. If all 4 pillars are restored, Enmadoji's Wounds are fixed at the minimum value.
- Seal-release route: destroy the pillars. Each pillar grants an immediate reward (gold / information). But Enmadoji is strengthened.
GM advice: guide the players according to their Three Ways and Six Hearts tendencies. Hegemony tempts them toward release; Loyalty draws them toward strengthening.
#Midpoint Combat
Seal Guardian Spirit (Elite, Wounds 4, Defense 14, Incorporeal 50%)
- It makes illusion attacks when a pillar is strengthened.
- Trial: whether the PCs truly intend to guard the seal.
#Sanctuary 2
- End of the 2nd floor. A place where the monks' remains are enshrined. Prayer reduces curse -1 (1/session).
#Act 4: Deepest Chamber, Enmadoji
#Enmadoji Stats (Incomplete Awakening, Seal Released by 1 Stage)
Enmadoji (閻魔童子): final lord-grade enemy (incomplete awakening)
Wounds 12, Defense 19, Energy 16
Courage+5, Physique+4, Wisdom+3, Presence+3 (Presence of Terror), Fate+3
Incomplete awakening state (seal released by 1 stage). Complete awakening (Wounds 18) is used as the campaign's final lord-grade version.
Techniques:
| Technique | Type | Energy | Check | Effect | Limit |
|---|---|---|---|---|---|
| Hand of Judgment | Attack A (Presence) | 3 | Presence opposed (2d10 + Presence(3) vs enemy 2d10+Courage) | 2 Wounds + forced Three Ways and Six Hearts check (on failure, the heart moves toward the dark side) | — |
| Hellfire | Attack B (Wisdom) | 4 | — (automatic) | 3 Wounds to everyone in the same zone. Exempt inside a Barrier. | 1/combat |
| Iron Wall | Defense | automatic | — | Defense 19 (permanently reduced by -1 when hit by Exorcism) | — |
| [Licensed] Samsara | Kata | 6 | 2d10 + Presence(3)+3 >= Defense | Target dies instantly (regardless of Wounds). Cannot be defended unless Physique >= 18. lord-grade enemies are exempt. | 1/combat |
Special:
- Authority of Despair: each PC in the zone gains curse +1 every round.
- Sealed One: when hit by an Exorcism technique, Defense is permanently reduced by -1. Repeated Exorcism attacks are the valid battle tactic.
- Defeat vs Seal Restoration: reducing Enmadoji to Wounds 0 is practically impossible (lord-grade design). The real victory condition is seal restoration.
#Victory Conditions
Seal-strengthening route (recommended):
- All 4 pillars were restored in Act 3.
- Perform an additional ritual in the deepest chamber (maintain the Barrier for 3 rounds).
- On success, Enmadoji is sealed again -> the PCs can escape.
Seal-release route (doom):
- The pillars were destroyed in Act 3.
- Enmadoji is on the verge of complete awakening; escape is the PCs' only option.
- In this case, Enmadoji's complete awakening (Wounds 18) appears again in the next campaign stage.
Combat cannot be sustained:
- Enmadoji has Energy 16 and Wounds 12. With the PC party's average DPT at about 3~5 Wounds/round, defeating him requires 2~4 rounds.
- But Hellfire (zone 3 Wounds) and Samsara (instant death) create a risk of total party death every round.
- Time is not on the PCs' side.
#Step-by-Step Progression Guide
#Act 1 Progression Guide: Four Virtues Trial
| Checkpoint | Timing | What the GM Does | What the Players Do | Signal (to Next Step) |
|---|---|---|---|---|
| Declare entrance sealed | Within first 5 minutes of the session | Sound of the rear door closing; state that they cannot go back | Check allies, agree on an initial plan | The four altars light up |
| Trial of Benevolence (仁) | First altar | Describe the dying child illusion and present the healing-resource cost | Declare help / ignore choice | The child vanishes (mercy) or black laughter (efficiency) |
| Righteousness, Rites, Wisdom in sequence | Mid-act | Make each altar's temptation clear; present the gold as if it is real | Checks + RP declarations, record curse | All altars resolved |
| Tally the pass check | End of act | Publicly calculate number passed / accumulated curse | Share resource status | The 1st-floor door rumbles |
- Success branch: all 4 trials passed. The 1st-floor entrance opens + curse -1 bonus. Player confidence; the GM uses that as the trap in the next act.
- Failure branch: 2 or fewer passed. The entrance opens, but curse +2; resources are short from the start. The GM may lightly hint that an escape route exists.
- GM control: the trials are not combat. On a failed check, do not ask "try again?" Cut it with "your choice has been recorded." Use pressure of weight, not pressure of time.
#Act 2 Progression Guide: Labyrinth of Desire
| Checkpoint | Timing | What the GM Does | What the Players Do | Signal (to Next Step) |
|---|---|---|---|---|
| Enter the labyrinth | Start of 1st floor | State that there is no map; portray disorientation | Agree on exploration order, check Critical Hit resources | First trap / illusion encounter |
| Encounter Illusion Enku | Mid-labyrinth | Call in an ally's voice and induce hesitation before attacking | Declare attack / talk / avoid | Core guilt scene occurs |
| Reach Sanctuary 1 | 2/3 point | Describe Barrier remnants and reconfirm that automatic recovery is impossible | Reset Energy, discuss the route ahead | Enter the Core Zone after passing the sanctuary |
| Escape the labyrinth | End of act | Check each character's accumulated curse | Share the danger of anyone near curse 9 | Stairs to the 2nd-floor corridor are found |
- Success branch: average curse accumulation 4 or less + everyone survives. The labyrinth remains "survivable." They have room to choose in the next act.
- Failure branch: one PC reaches curse 8. Tell the player that NPC conversion is imminent; time to prepare a backup character. Alternatively, an ally may perform a sacrificial ritual to allow curse -2 (with a heart (心) shift).
- GM control: let the players choose the order of labyrinth zones, but place the 3 core traps (doubles / banquet / contract) so they must be encountered. Accept attempts to avoid them, but charge a price (time + a small amount of curse).
#Act 3 Progression Guide: Sealing Corridor
| Checkpoint | Timing | What the GM Does | What the Players Do | Signal (to Next Step) |
|---|---|---|---|---|
| Contact pillar 1 | Corridor entrance | Describe the gaze of the monks' portraits; present strengthening / release branch | Check Three Ways and Six Hearts tendencies, make an initial decision | First pillar handled |
| Encounter seal guardian spirit | Between pillars 2~3 | Deliver the guardian spirit's trial lines and test sincerity toward the seal | Declare combat / conversation / retreat | Guardian spirit handled |
| Handle pillar 4 | Late act | Emphasize the weight of the final pillar choice; summarize all pillar results | Confirm final branch | All 4 pillars handled |
| Pass Sanctuary 2 | End of act | Allow prayer before the monks' remains (curse -1) | Settle Energy / Wounds, plan final strategy | Deepest-chamber door opens |
- Success branch: all 4 pillars restored. Enmadoji's Wounds are fixed at the minimum value, making victory in Act 4 materially possible. The guardian spirit may also join and provide an auxiliary Barrier.
- Failure branch: 2 or more pillars destroyed. Enmadoji is strengthened; Act 4 is effectively an escape battle. Make the players feel that this route becomes the long-term buildup for the campaign.
- GM control: distribute temptation toward Hegemony-leaning PCs and burden toward Loyalty-leaning PCs evenly. Stir another axis so one side cannot decide everything unilaterally. The guardian spirit's tone is not command but petition (請願).
#Act 4 Progression Guide: Deepest Chamber, Enmadoji
| Checkpoint | Timing | What the GM Does | What the Players Do | Signal (to Next Step) |
|---|---|---|---|---|
| Enter the deepest chamber | Start of act | Portray the room temperature rising and Enmadoji appearing in silence | Confirm formation, divide roles | Determine the first round |
| Survive the first round | Rounds 1~2 | Reveal either Hand of Judgment or Hellfire 1 time | Apply curse +1 from Authority of Despair, decide whether to spend Critical Hit resources | First PC is critically wounded or evades |
| Begin ritual | Middle | Announce the seal-restoration ritual procedure (maintain for 3 rounds) | Split ritual role and defense role | Ritual round 1 succeeds |
| Complete ritual or escape | Climax | Place Samsara only at a crisis point for ritual failure | Spend final Critical Hits and Energy | Seal restarts or emergency escape route opens |
- Success branch: complete the 3-round ritual. Enmadoji is sealed again, the Four Virtues implements are obtained, and advancement is possible. The escape scene is the walk of victors; do not rush it.
- Failure branch: ritual failure or accumulated PC deaths. The sanctuary's hidden escape route opens. Fame +2, and Enmadoji's complete awakening is foreshadowed as the next campaign's main axis.
- GM control: use Samsara only 1 time, at the dramatic peak. Do not use it randomly. Immediately before declaring a total party kill, the GM must offer the choice "there is an escape route"; the players' retreat is not defeat, but a narrative decision.
#Rewards
Survival + seal restoration:
- Four Virtues implements (gained at session end): Rosary of Benevolence, Ring of Righteousness, Secret Learning of Rites, Scripture of Wisdom. Each is [Masterwork]-grade equipment.
- Fame +10 (great seal completed).
- Curse removal (Myoan's ritual).
- Advancement is immediately possible.
Escape only:
- Emergency escape passage discovered in a sanctuary (hidden route).
- A little gold, Fame +2.
- Enmadoji complete awakening -> main enemy of the next scenario.
Total party death:
- PCs die. Return with backup characters (rescuing comrades from this scenario becomes the new scenario).
#GM Advice
- Judgment dungeon: choice over combat. In each room, "fight, bypass, or talk?"
- Curse tracking: clearly record each PC's curse value. Warn at 9.
- Weight of the Four Virtues trial: the entrance choices determine the success rate in the deepest chamber. If the trial pass rate is 3 or higher, seal restoration is possible.
- Allow PC death: this is a killer dungeon. Prepare 3~4 backup characters. On death, shift into drama.
- Make the escape option clear: when PCs say "we want to stop," let them glimpse the sanctuary passage so voluntary escape becomes possible.