#Chapter 4 — Zone Tactics
Contents
The battlefield is not a grid. Where you stand is not a coordinate but a zone, and which zone you stand in decides what your blade can do. The same uchigatana feels different swung on the Front Zone and thrust in the Core Zone. This chapter covers what the five zones permit you and what they deny you, and how you set foot on ground the enemy controls.
Before you roll combat, remember only this. Where you stand decides what you can do.
#1. The Five Zones
The battlefield divides into eight zones, but the axes you actually travel are five. Below is the layout from the allied side. The enemy side faces you in mirror symmetry.
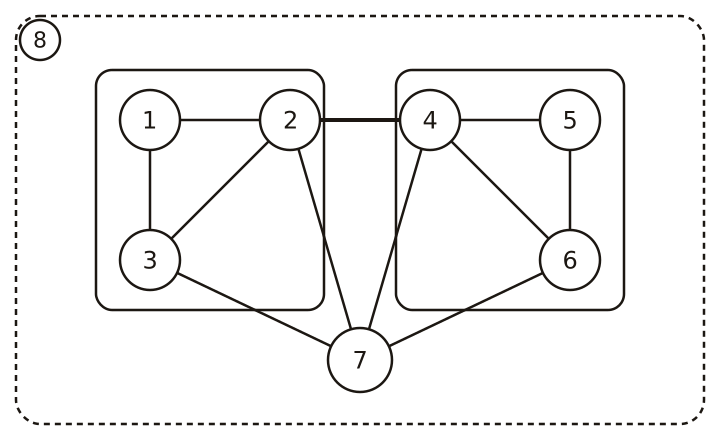
| Number | Zone |
|---|---|
| 1 | Ally Rear Zone |
| 2 | Ally Front Zone |
| 3 | Ally Outer Zone |
| 4 | Enemy Front Zone |
| 5 | Enemy Rear Zone |
| 6 | Enemy Outer Zone |
| 7 | Core Zone |
| 8 | Outside (dashed border — surrounds the whole battlefield; enter and exit only with specific techniques) |
| Zone | Character | What grows stronger |
|---|---|---|
| Front Zone (前列) | The engagement line where the main forces clash. The Allied Front and the Enemy Front are directly adjacent — stand on the Front Zone and you can strike the enemy on the opposite Front Zone at once. | All yari techniques +1 (Spear Wall stance grants Domination +1 more), cavalry charge techniques usable only on the Front Zone. But dagger attack techniques -1 (the distance has opened up). |
| Rear Zone (後列) | The relatively safe rear where archers, teppo corps, and the command post sit. The terminus of a Breakthrough and the supply line. | Teppo/Archery techniques +1 (a steady firing stance). Once per round for each actor, the first paid Rear-Zone task costs -1 Energy (minimum 1). Eligible tasks are limited to teppo reloading, repair of explicitly stated equipment damage, and restoring another target's Wounds with a Medicine skill or technique; free [upkeep] does not qualify. Melee techniques cannot be used unless the enemy enters. |
| Flank Zone (外郭) | The side-detour route. The stage for stealth movement and Surprise Attacks. | Infiltration-related techniques +2. Move + attack from the Flank Zone into an adjacent zone for a basic Surprise Attack (first attack check +2). In exchange, squad-order techniques cost Energy +1 (dispersed deployment). |
| Core Zone (心府) | An extreme melee where both armies are tangled into one. A high-risk special zone where the rules break down. Detailed rules in §4. | Dagger and unarmed combat become king, and long weapons become a burden. |
| Outside Zone (外部) | Beyond the battlefield — the spirit realm, underground, deep in the forest. The domain of shinobi and yoma alone. | Move + attack from the Outside Zone to anywhere for an enhanced Surprise Attack (first attack check +2, the target cannot use reaction techniques). But you can enter only with specific techniques and specialties. |
Beyond these five, the GM may open special zones according to terrain, such as high ground (ranged +2, melee -1) or underwater (Unarmed Combat +2, no firearms, movement +1 Energy). The rules follow the same axis.
#2. Movement — Where You Can Go
Whether you can move is judged by adjacency. You cannot go directly to a zone that is not adjacent.
| Current position | Adjacent zones you can reach |
|---|---|
| Allied Rear | Allied Front, Allied Flank |
| Allied Front | Allied Rear, Enemy Front, Allied Flank, Core Zone |
| Enemy Front | Allied Front, Enemy Rear, Enemy Flank, Core Zone |
| Enemy Rear | Enemy Front, Enemy Flank |
| Allied Flank | Allied Rear, Allied Front, Core Zone |
| Core Zone | Allied Front, Enemy Front, Allied Flank, Enemy Flank |
| Outside Zone | Shinobi and yoma only. Connected to every zone, but free movement is not possible. |
The Energy cost of movement (walking, sprinting, stealth movement, leaping, etc.) follows Chapter 3, "Energy and Breath." A summary of which movement matters in which zone follows.
- Adjacent relocation: walk, sprint. The basic axis for moving among Front, Rear, and Flank.
- High-ground access: leap. Creates a landing attack or a shooting advantage.
- Maintaining Flank infiltration: stealth movement. Handles movement and maintaining infiltration together.
- Core Zone entry: free Core Zone entry or forced Core Breakthrough. The cost and risk differ by class and skill (§4).
- Outside operation: Outside entry. A special axis centered on shinobi and infiltration masters.
#3. Domination and Breakthrough
#3-1. What Domination Does to You
The master of a zone is decided not by the blade but by numbers. Each zone calculates allied Domination and enemy Domination separately, the sum of the units' headcount and quality plus a few bonuses. What you need to know is not that sum, but what happens to you when the sums fall out of balance.
| Allied Domination vs Enemy Domination | State | Effect on you |
|---|---|---|
| Allied > Enemy | Allied Control | For the enemy to enter this zone, they must make a Breakthrough check. You enter freely. |
| Allied = Enemy | Stalemate | Both sides enter freely. |
| Allied < Enemy | Enemy Control | For you to enter this zone, you must make a Breakthrough check. |
| Difference 5 or more | Complete Domination | Breakthrough Target Number +2. |
Control comes with a monopoly on advantages. If allies control the Front Zone, allied yari get the Front Zone bonus (+1), but enemy yari do not get that bonus (only the penalty applies). Lose the Front Zone and it reverses. So a zone is not merely "a line that forces a Breakthrough check" but a place where the side that stands there first monopolizes that ground's advantages.
Domination changes in real time. It recalculates at once whenever a unit enters or leaves, an allied Minion falls, or an area attack causes many casualties. Your own character's presence is part of Domination too, so which zone you stand in changes that zone's master.
Sources: co-05-02 §Effect of Domination · §Domination Changes
#3-2. Breakthrough — Setting Foot on Ground the Enemy Controls
Move into a zone where enemy Domination is higher than allied, and a Breakthrough check triggers automatically.
- Cost: base movement 2 Energy + 1 additional Energy = 3 Energy total.
- Check:
2d10 + Courage(勇) >= Target Number
| Situation | Target Number |
|---|---|
| The enemy is slightly ahead (difference 1~4) — standard Breakthrough | 11 |
| The enemy has Complete Domination (difference 5 or more), or a zone under a Domination-boosting specialty such as the Immovable Formation | 13 |
| A zone whose narrow path is blockaded — Blockade Breakthrough (below) | 15 |
The Breakthrough Target Number is fixed at the three steps 11 / 13 / 15. The pressure of Domination is expressed not by finely subdividing the Target Number but as the price paid on failure.
| Check type | Success | Failure |
|---|---|---|
| Normal Breakthrough (11/13) | Enter normally. Spend 3 Energy. | Spend only the Energy. Cannot move. Gain Defenseless. |
| Blockade Breakthrough (15) | Enter normally. Spend 3 Energy. | Spend only the Energy. Cannot move. Gain Defenseless. Cannot enter that zone until your next count (thrown back). |
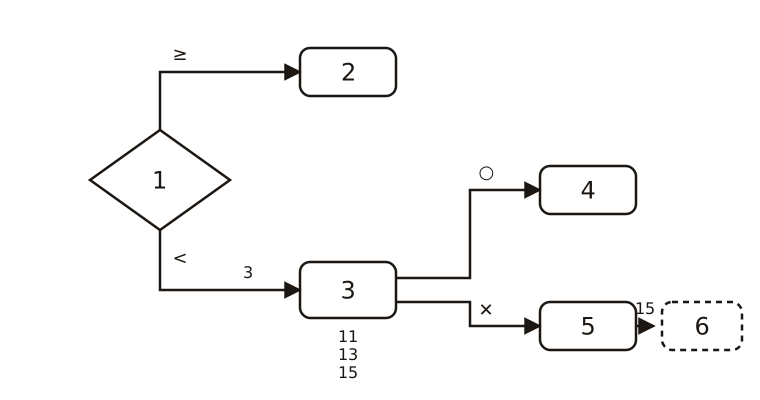
| Number | Meaning |
|---|---|
| 1 | Compare domination before moving |
| 2 | If the enemy is not ahead, enter freely |
| 3 | If the enemy is ahead, make a breakthrough check — target 11/13/15, 3 Energy |
| 4 | Success: enter normally |
| 5 | Failure: spend Energy, cannot move, become Defenseless |
| 6 | Blocked (15) failure only, extra: cannot enter until your next count |
When 15 comes up — a narrow path blockade. Narrow paths such as bridges, mountain trails, and castle-gate passages carry a Domination cap (usually 3~5), and the moment one faction reaches that cap, it blockades the zone. The opposing faction cannot enter a blockaded zone by any normal movement. The only way to force entry is a Blockade Breakthrough at 2d10 + Courage >= 15. The scene of Benkei alone holding a bridge and stopping the dozens who follow is expressed by this single rule. The standard way to break a blockade is not to force it but to thin the blockading side by ranged fire, dropping their Domination below the cap and lifting the blockade.
When you enter freely without a Breakthrough: in a zone where enemy Domination is at or below allied (Stalemate or Allied Control), you enter without a check. The ronin talent "Wind Blade" discounts movement Energy by 1 when entering an engaged zone, and a squad's Shield Wall Charge (squad order 3 Energy + Cohesion -1) makes the Breakthrough check succeed automatically.
The forced charge that drives all the way to the Rear Zone in one go, and the chain Breakthrough that links several zones, are commander-grade gambles. Know only that they exist — the detailed rules are in the core rulebook.
Sources: co-05-03 §Breakthrough · §Breakthrough Exemption, co-05-05 §Narrow Path, co-03-08 §2
#4. The Core Zone — To Leap In or Not
#4-1. Why the Core Zone Is Different
A carnage where the Front Zone has collapsed and both armies are tangled into one, the heart of a giant yoma, atop a cart that must be seized at all costs — such a place is the Core Zone. Amid the stench of blood and the screaming, you cannot even tell who is on your side. Here regular formations lose their meaning, long and heavy weapons become a burden, and the short, lethal dagger becomes king.
Step into the Core Zone and the following modifiers all apply at once. Check them every time you enter.
- Domination: all bonuses become void, and allied Domination and enemy Domination cancel each other out (Zero-Sum). If the subtracted value is negative, treat it as 0. Core Zone Domination is always "unstable."
- Stance: the Domination bonus of Front-Zone-based stances is void (Immovable Formation +4 and the like are useless in the Core Zone too).
- Weapon Energy: short weapons (dagger, kodachi, ninjato, etc.) cost Energy -1 (minimum 1). Standard weapons (katana, vajra, etc.) are ±0. Long weapons (yari, nodachi, rokushakubo, tetsubo) cost Energy +1 (too cramped to swing).
- Ranged fire only from outside the Core Zone. Shoot an enemy inside the Core Zone from outside it and miss, and you make a Misidentified Fire check — roll
d10, and on 1~3 you hit 1 random ally inside the Core Zone (1 Wound). - Esoteric monk "Seal of Shura": an additional Energy -1 to melee attacks inside the Core Zone (the minimum 1 is kept, so a 0-Energy attack is not possible).
For this reason dagger and unarmed builds become strongest in the Core Zone, while yari and nodachi builds are better off staying on the Front Zone outside it. Which zone you are strongest in is your build's very identity.
Sources: co-05-04 §Combat Modifiers · §Core Zone Modifier Integrated Quick Reference, co-03-08 §1
#4-2. How to Enter the Core Zone
Core Zone entry is unrelated to Domination. Instead, the cost and risk differ by class.
| Your state | Entry method | Energy | Check |
|---|---|---|---|
| Free Core Zone entry class (list below) | Free entry | 2 | None |
| Others (a Lord/Elite-grade individual) | Forced Breakthrough | 3 | 2d10 + Courage(勇) >= 13 (fixed Target Number). On failure, cannot move + Defenseless. |
| Minion/Veteran squad | Squad-order only | Command Energy + 1 | Automatic entry. Cohesion -1 (stragglers). |
The Target Number for a forced Core Breakthrough does not use the 11/13/15 system of a normal Breakthrough but is fixed at 13. Because Domination is offset in the Core Zone, a difference-based Target Number loses its meaning.
Free Core Zone entry classes (6 kinds): ronin, shinobi, esoteric monk, shugenja, wildlander, hanyo. (The puppeteer needs a forced Breakthrough themselves; only the puppet enters freely.)
Exit is harder than entry. Show your back and flee, and a blade lodges in it.
| Your state | Exit method | Energy | Check |
|---|---|---|---|
| ronin / shinobi | Free exit | 2 | None |
| Others | Checked exit | 2 | 2d10 + the higher of Finesse or Physique >= 11. On failure, cannot move + Defenseless. |
| Others | Forced exit | 4 | Certain exit with no check. |
Sources: co-05-04 §Entry Conditions · §The Bog of Exit, co-05-03 §Breakthrough (separate Core Zone rules)
#4-3. If You Control the Core Zone
Survive to the end in the Core Zone and maintain superior Domination, and a reward comes.
- 1-round control (pressure): while you maintain it, allied Front Zone Domination +1, and on that lull all allied squads recover Cohesion +1. It vanishes at once if the enemy retakes superiority.
- 3-round continuous control (Core Zone dissolves): the Core Zone disappears — that spot is absorbed into the allied side and the offset rule is lifted. As a 1-time effect, all enemy Cohesion -3, all allied Cohesion +2, next round every allied first attack gains automatic Critical Hit expansion, and 1 enemy Rear Zone squad automatically routs.
The standard victory condition for a "Core Zone occupation" scenario is this 3-round continuous control. You need not annihilate the enemy — just maintain Domination.
Sources: co-05-04 §Reward for Controlling the Core Zone
#5. Pincer Attack — Strike from Front and Back at Once
Press an enemy in the same zone from both adjacent zones at once, and the enemy does not know where to point the blade. The instant they raise it toward one person their back opens; the instant they guard their back the front opens. A pincer attack triggers only when all three conditions are met.
- Allies must be occupying the adjacent zones on both sides of the same enemy zone.
- Both sides must perform an attack action within the same round (merely occupying the positions and sitting still does not trigger it).
- Both sides must activate a [Kata] or [technique] 1 or more times (a squad Volley Fire counts).
On trigger, the enemy in the pincered zone suffers Defense -2 (attention split to both sides), the enemy squad's Cohesion check takes a -1 penalty, and the enemy's Breakthrough check inside the pincered zone takes +2 (escape is hard). If the allies in one adjacent zone all retreat or are removed, the pincer is lifted at once, and because the effect refreshes by round, both sides must attack on the next round too to maintain it.
A shinobi merely flanking to the Flank Zone does not establish a pincer. The pincer takes hold only if they attack from that flanking position too.
Sources: co-03-08 §5
#6. Three Set Plays
This shows how the rules of this chapter weave together at the actual table — three moves used often. All of them are merely combinations of the rules above; there is no new rule.
Set Play 1 — Spear Wall and firing line. A vanguard holding a yari stands on the Allied Front and builds Domination in the Spear Wall stance, while the teppo and archers in the Rear thin the Enemy Front, receiving the shooting bonus (+1). For the enemy to push into the Front they must roll a Breakthrough (11 or 13), and on failure they become Defenseless and are fodder for the next volley. The point is that while you hold Front Zone Domination, the Rear is safe — if the vanguard collapses, the firing line collapses too.
Set Play 2 — Flank detour pincer. While the main body holds the Enemy Front head-on from the Allied Front, a shinobi rides the Flank to take position in the adjacent zone on the far side of the Enemy Front (the Core Zone or the Enemy Flank). If both sides land an attack in the same round, a pincer is established — target Defense -2, Cohesion check -1. If the shinobi's move was a move + attack burrowing from the Flank into the adjacent zone, the basic Surprise Attack (+2) rides on that first attack as well. Remember that if you only detour and never put steel on them, nothing happens.
Set Play 3 — Core Zone dissolution operation. A short-weapon party (ronin, shinobi, esoteric monk, and other free-entry classes) leaps into the Core Zone, seizes superior Domination, and holds. Hold for 1 round and allied Front Zone Domination +1 and Cohesion recovery begin to flow; a 3-round streak dissolves the Core Zone itself and flips the table. The long-weapon party should not follow in — support Domination from the Front outside the Core Zone, because inside the Core Zone a yari is a burden of Energy +1.
#Summary
- The five zones: Front (spear, cavalry, the melee line), Rear (fire, upkeep, supply), Flank (infiltration, Surprise Attack), Core (a melee where the dagger is king), Outside (shinobi and yoma only). Which techniques each zone strengthens or weakens is the value of that position.
- Movement: you move only by adjacency. The Allied Front and Enemy Front are directly adjacent.
- Domination: to enter a zone the enemy controls (enemy > allied), make a Breakthrough. A difference of 5 or more is Complete Domination (Target Number +2). The controlling side monopolizes that zone's advantages.
- Breakthrough: cost 3 Energy (base 2 + additional 1),
2d10 + Courage >= 11/13/15. On failure, cannot move + Defenseless. 15 is a narrow-path Blockade Breakthrough (with thrown-back added on failure). - Core Zone: Domination offset, stance void, short weapon -1 (minimum 1) / long weapon +1, Misidentified Fire (d10 1~3). 6 free-entry classes (ronin, shinobi, esoteric monk, shugenja, wildlander, hanyo); others use a forced Breakthrough at a fixed 13. 3-round continuous control = the Core Zone dissolves.
- Pincer Attack: attack from the adjacent zones on both sides at once for target Defense -2, Cohesion check -1, Breakthrough check +2.